Table of Contents
As an Amazon Associate, we earn from qualifying purchases. This means we may receive a small commission at no extra cost to you when you buy through links on this page.
Introduction: Why Pushchair Brake Maintenance Matters
A fully functioning pushchair brake is absolutely critical for your child’s safety. Even a momentary lapse in brake performance can lead to a runaway pushchair and a potentially serious accident. In the UK, while there isn’t a specific, legally mandated *inspection* schedule for pushchair brakes, the Consumer Protection Act 1987 places a duty of care on manufacturers and retailers to ensure products are safe. Furthermore, parental responsibility dictates maintaining equipment to a safe standard. Regular checks are strongly recommended by organisations like RoSPA (the Royal Society for the Prevention of Accidents). Common brake types found on UK pushchairs include cable-operated brakes, lever brakes, parking brakes (often combined with the other types) and, increasingly, electronic braking systems. This guide will help you understand, maintain, and troubleshoot these systems.
Understanding Your Pushchair Brake System
Cable Brakes
Cable brakes are a common and relatively simple system. A lever on the pushchair handle connects to a cable that runs down to the wheels. When the lever is squeezed, the cable pulls on a mechanism that engages the brake. These are often found on more budget-friendly pushchairs.
Lever Brakes
Similar to cable brakes, lever brakes rely on a lever to activate the braking mechanism. However, the linkage might be more direct or incorporate a different type of actuator. Often found on more premium pushchairs offering a more responsive feel.
Parking Brakes
Typically a hand-operated lever or foot pedal, parking brakes are designed to securely hold the pushchair in place on inclines. These often work in conjunction with the wheel brakes, engaging them simultaneously. Many modern pushchairs have combined parking and wheel brake systems.
Electronic Brakes
In 2026, electronic braking systems are becoming more prevalent, particularly on high-end pushchairs. These utilize electronic actuators to engage the brakes, often controlled via a button on the handle. They often include features like automatic hill hold. These systems require specialist knowledge for repair.
Regular Pushchair Brake Checks: A Step-by-Step Guide
Make pushchair brake checks a habit! Here’s a simple checklist:
- Visual Inspection: Check the brake levers/buttons and cables for any signs of damage – fraying, rust, or kinks.
- Engagement Test (Flat Surface): Engage the brakes on a flat, level surface. Ensure all wheels are firmly locked. Try to move the pushchair – it should not roll.
- Engagement Test (Slope): Find a gentle slope. Engage the brakes and test again. The pushchair should remain stationary.
- Listen for Noises: Pay attention to any squealing, grinding, or clicking sounds when operating the brakes. These could indicate wear or a problem with the mechanism.
- Check for Equal Resistance: When engaging the brakes, ensure both sides offer similar resistance. Uneven resistance could indicate a problem with one brake.
Frequency: Check the brakes before each use, especially before navigating slopes or busy areas. A more thorough inspection should be conducted monthly.
Troubleshooting Common Pushchair Brake Problems
Here’s a guide to common issues:
- Brake Feels Loose: Usually indicates cable stretch or a need for adjustment (see section below).
- Brake Won’t Engage: Could be a broken cable, a jammed mechanism, or a problem with the brake actuator.
- Brake Sticks: Often caused by dirt, grime, or corrosion in the brake mechanism.
- Brake Cable Fraying/Snapping: Requires immediate replacement. Do not use the pushchair until the cable is replaced.
Safety Warning: If you are unsure about any repair, or if the problem is complex (particularly with electronic brakes), do not attempt a DIY fix. Seek professional help. Tampering with safety-critical components can be dangerous.
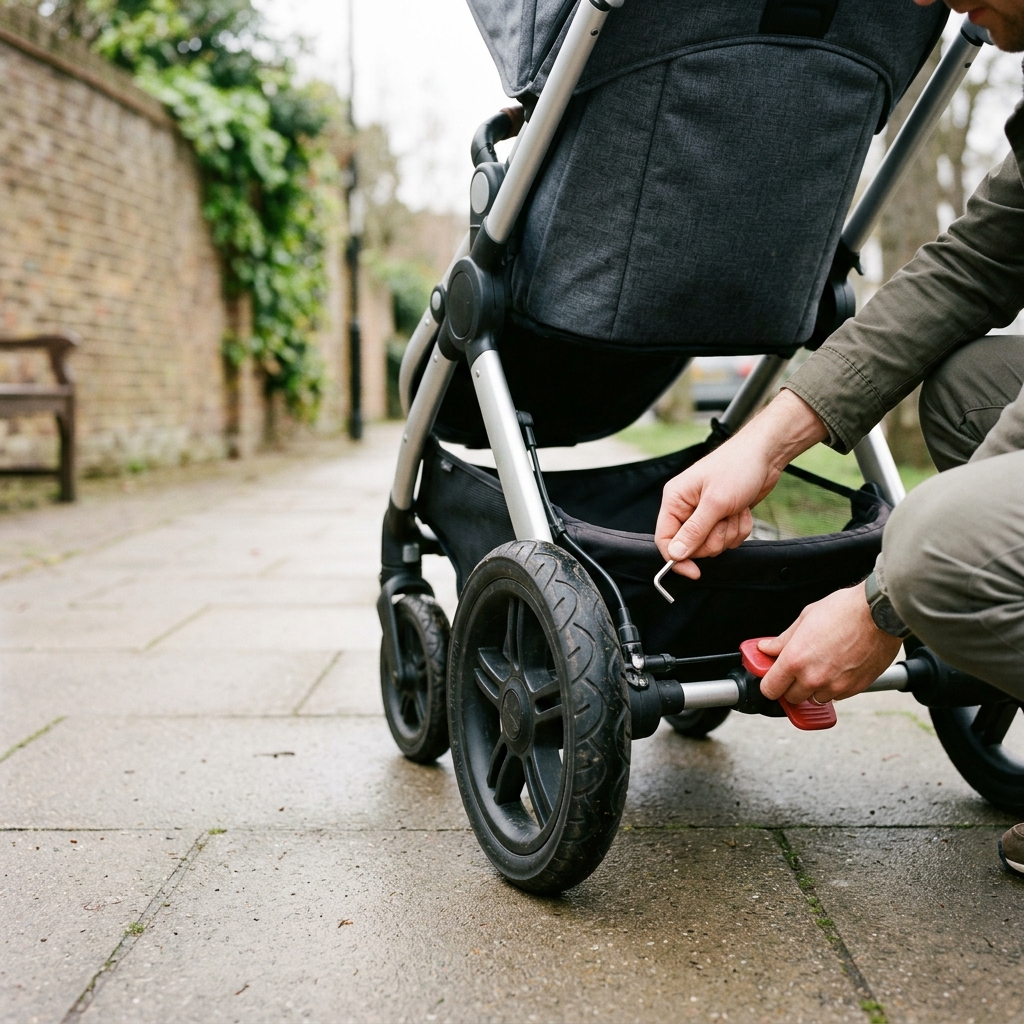
DIY Pushchair Brake Maintenance: Cable Adjustment & Cleaning
Cable Adjustment: Many cable brakes have an adjustment mechanism near the wheel or brake lever. This allows you to tighten the cable if it becomes loose.
Tools Required: Pliers, potentially a small screwdriver.
Steps:
- Locate the cable adjustment mechanism.
- Loosen the locknut (if present).
- Turn the adjuster to tighten the cable (clockwise usually).
- Retighten the locknut.
- Test the brakes to ensure proper engagement.
Cleaning: Dirt and grime can affect brake performance. Use a mild detergent and water to clean the brake mechanisms. Avoid getting water into the cables.
Lubrication: Applying a light lubricant, such as WD-40 Specialist Lubricant (£8.99), to the brake cables (after cleaning and drying) can help keep them moving smoothly. Do not over-lubricate.
External Resources: For visual guides, see #.
When to Seek Professional Pushchair Brake Repair
Certain problems require the expertise of a qualified technician:
- Broken brake cables that you are unable to replace yourself.
- Damaged brake calipers or actuators.
- Problems with electronic braking systems.
- Inability to resolve issues with DIY methods.
UK Pushchair Repair Services: Find a local repair service using resources like https://www.pushchair-repair.co.uk.
Preventative Maintenance: Extending Your Pushchair Brake’s Lifespan
Protect your brakes from the elements:
- Rinse the pushchair after use in wet or muddy conditions.
- Store the pushchair in a dry place.
- Avoid overuse of the parking brake on long declines – it can cause excessive wear.
- Regularly lubricate the brake cables.
Pushchair Brake Safety Standards & Recalls (UK 2026)
Pushchairs sold in the UK must comply with BS EN 1888, which sets out stringent safety requirements, including those relating to braking performance. This standard ensures brakes are reliable and effective.
Recalls: It’s crucial to stay informed about potential safety recalls affecting your pushchair. Check the following resources:
- RoSPA Product Recall Information: https://www.rospa.com/safety-information/product-recalls
- Trading Standards: https://www.tradingstandards.gov.uk/ (official government website)
Conclusion: Keeping Your Child Safe with Reliable Pushchair Brakes
Maintaining your pushchair brakes is a simple but crucial task that directly impacts your child’s safety. Regular checks, preventative maintenance, and knowing when to seek professional help are all essential. Don’t compromise on safety – a few minutes of inspection can prevent a serious incident. Remember, reliable brakes provide peace of mind and allow you to enjoy your time with your little one.
Product Comparison Table
| Product Name | Description | Price (GBP) |
|---|---|---|
| WD-40 Specialist Lubricant | Penetrating oil for cleaning and lubricating brake mechanisms | £8.99 |
| Cable Cutter Tool Set | Essential for replacing frayed or broken brake cables | £19.99 |
| Silver Cross Simplicity Plus Pushchair (Replacement Brake Cables) | Specific replacement cables for the Silver Cross Simplicity Plus model | £12.50 |
| Britax B-Agile 3 Pushchair (Brake Repair Kit) | Kit containing replacement parts for the Britax B-Agile 3 brake system | £25.00 |
| iCandy Peach 7 Pushchair (Professional Brake Service – Voucher) | Voucher for a professional brake service at an iCandy authorised repair centre | £49.99 |
FAQ
- Q: How often should I replace pushchair brake cables?
A: It depends on usage and conditions. Inspect regularly for fraying. Replace immediately if damaged – typically every 1-2 years with regular use. - Q: Can I use any lubricant on my pushchair brakes?
A: Use a specialist lubricant designed for cables and mechanisms. Avoid heavy oils or greases that can attract dirt. - Q: What should I do if my electronic brakes stop working?
A: Do not attempt to repair them yourself. Contact the manufacturer or a qualified technician. - Q: Is it safe to use a pushchair with a slightly loose brake?
A: No. A loose brake is a safety hazard. Adjust or repair it before using the pushchair. - Q: Where can I find the model number of my pushchair?
A: The model number is usually located on a sticker or plate on the pushchair frame, often underneath the seat or near the wheels.